Home Assistant combined with Zigbee provides a local-first smart home platform without dependence on vendor clouds. It allows you to manage lighting, sensors, switches, and energy devices using open standards and transparent configuration.
Zigbee operates on IEEE 802.15.4 at 2.4 GHz in Europe and relies on a mesh network of routers and end devices. Home Assistant integrates Zigbee through multiple software stacks, offering different levels of control and complexity.
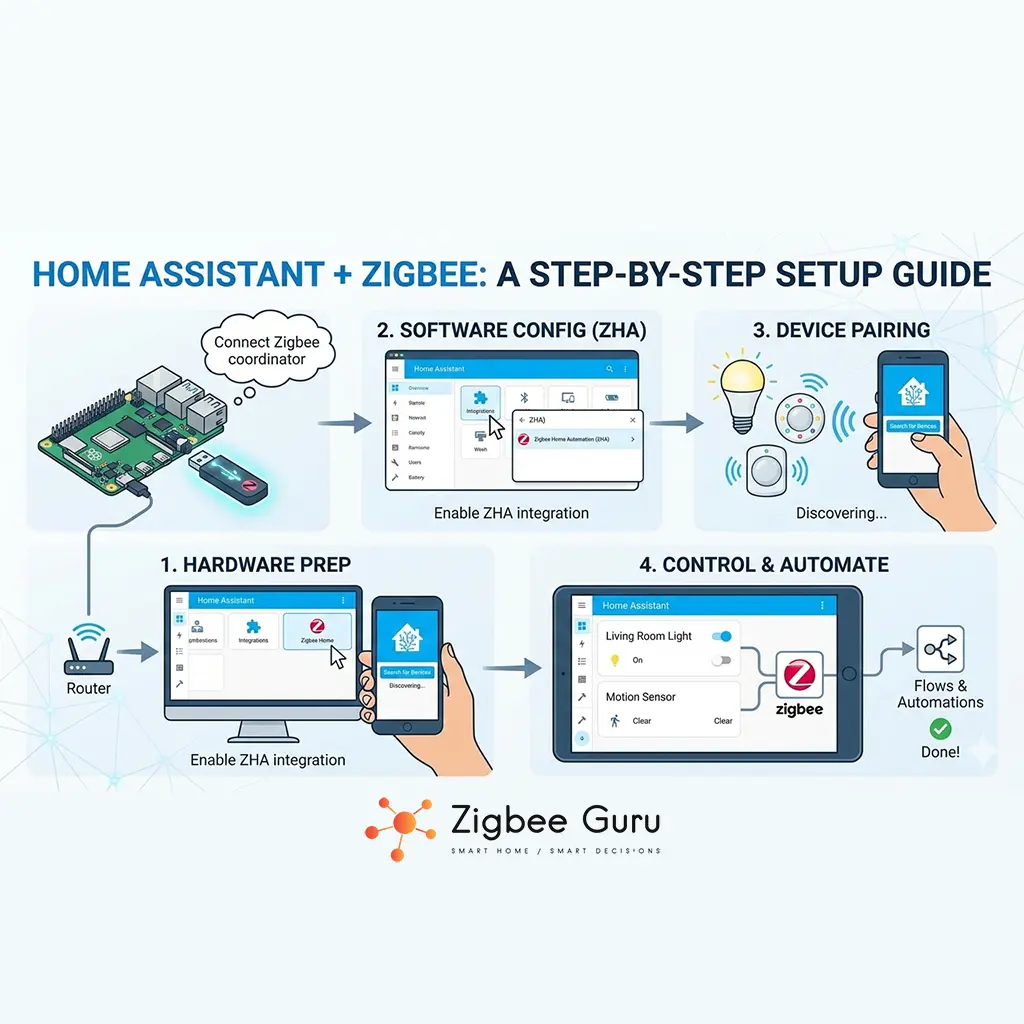
This step-by-step guide explains how to set up Home Assistant with Zigbee in a structured and reliable way, including where Home Assistant can run, how the software layers fit together, and how to design for typical EU RF conditions.
Table of Contents
- Overview: Home Assistant and Zigbee
- Where to Install Home Assistant
- The Guru Stack: Zigbee and Home Assistant Layers
- Installing Home Assistant OS (HAOS)
- Choosing a Zigbee Coordinator
- ZHA vs Zigbee2MQTT vs deCONZ (and Mosquitto)
- Pairing Zigbee Devices
- Mesh Planning and Router Placement
- Channel Selection and Wi-Fi Interference
- Troubleshooting Common Issues
Overview: Home Assistant and Zigbee
Home Assistant is a local-first automation platform that runs on your own hardware and integrates a wide range of smart home protocols. Zigbee support is native and does not require cloud connectivity.
Zigbee uses a coordinator, routers, and end devices to form a low-power mesh network. Home Assistant communicates with the coordinator and exposes devices as entities for automation and monitoring. For protocol fundamentals, see What Is Zigbee?.
- Local control and data privacy
- Multi-vendor Zigbee device support
- Flexible automation logic
- Integration with other protocols and services
Where to Install Home Assistant
Home Assistant does not run only on Raspberry Pi. You can install it on a Raspberry Pi 4/5, a Home Assistant Yellow, a small x86 mini PC (NUC-class), a NAS, or a virtual machine on a server.
You can also run Home Assistant on a desktop PC or laptop, but an always-on system with Ethernet is typically more stable for a home hub. For long-term reliability, use an SSD instead of an SD card to reduce database corruption risk.
| Installation method | What it is | Typical use |
|---|---|---|
| Home Assistant OS (HAOS) | Dedicated OS with Supervisor and add-ons | Most users, stable Zigbee environments |
| Home Assistant Container | Home Assistant in Docker | Advanced users with existing Docker stack |
| Home Assistant Core | Python venv install without Supervisor | Custom setups, higher maintenance |
Regardless of platform, stable power and stable networking matter more than CPU. A hub that reboots or changes IP addresses will create avoidable Zigbee and automation issues.
The Guru Stack: Zigbee and Home Assistant Layers
Zigbee setups fail most often because the “layers” are mixed up. Treat the system as a stack: radio hardware at the bottom, an OS to host services, an engine that speaks Zigbee, optional message transport, and Home Assistant as the control plane.
For Zigbee specifically, the clean model is: hardware radio → OS/host → one Zigbee engine (ZHA or Zigbee2MQTT or deCONZ) → optional MQTT broker (only for Zigbee2MQTT) → Home Assistant UI and automations.
- Layer 1: Hardware (Radio) — Zigbee USB stick or network coordinator (e.g., SONOFF dongle or SkyConnect class devices).
- Layer 2: OS (Foundation) — HAOS, or a Linux host for Docker/VM installs.
- Layer 3: Engine (Zigbee stack) — choose one: ZHA, Zigbee2MQTT, or deCONZ.
- Layer 3.5: Mailman (MQTT) — Mosquitto broker; needed only when using Zigbee2MQTT.
- Layer 4: Boss (Control) — Home Assistant dashboards, entities, and automations.
| Component | What it is | Why it matters |
|---|---|---|
| HAOS | Operating system layer | Handles updates, Supervisor, add-ons, hardware management |
| Home Assistant Core | Main application | Entities, dashboards, automations, history, integrations |
| ZHA | Zigbee integration inside Home Assistant | Direct Zigbee support without MQTT |
| Zigbee2MQTT | External Zigbee service | Advanced device support and configuration, decoupled from Core restarts |
Guru’s rule: you cannot (and should not) run ZHA and Zigbee2MQTT on the same coordinator at the same time. Pick one engine per Zigbee network and design around it.
Installing Home Assistant OS (HAOS)
Home Assistant can be installed via Container or Core, but for most smart home deployments—especially when you want a stable Zigbee environment—Home Assistant OS (HAOS) is the simplest operational baseline. HAOS is a headless OS that manages updates and add-ons through the Supervisor.
Step 1: Flash HAOS to your hardware (Raspberry Pi, Home Assistant Yellow, or generic x86-64). Use an SSD when possible, and use a reliable flasher tool such as BalenaEtcher. Boot with Ethernet rather than Wi-Fi for the hub to minimize latency and RF uncertainty.
- Boot and access UI: wait several minutes, then open http://homeassistant.local:8123 from a device on the same LAN.
- If .local fails: use your router’s client list to find the IP (e.g., http://192.168.1.50:8123).
- Create your owner account: use a strong password; this system becomes a security control plane.
- Set location: required for sunrise/sunset and location-based automations.
Step 3: verify system health and updates before adding Zigbee. Apply pending Core/OS updates, check Health status, and set a static IP in Network settings so the hub keeps the same address after power events.
Step 4: connect the coordinator correctly. Do not plug a Zigbee USB stick directly into a USB 3.0 port; USB 3.0 can emit 2.4 GHz noise that reduces range. Use a 1–2 m USB extension cable and keep the radio away from Wi-Fi antennas (see Why Zigbee devices lose connection: Real fixes).
- Verify detection: Settings → System → Hardware → All Hardware, then look for ttyUSB or ttyACM.
- Avoid unstable power: poor power supplies and noisy USB hubs can cause disconnects and coordinator resets.
Choosing a Zigbee Coordinator
The Zigbee coordinator is the root of your network and directly affects stability, range, and device capacity. Common choices include USB adapters based on Texas Instruments CC2652 or Silicon Labs EFR32 chipsets (for example, SONOFF dongle-class coordinators and Home Assistant SkyConnect-class radios). 👉 Check Price on Amazon
Coordinator firmware influences feature support and scale limits. Community-supported firmware is often updated faster than factory defaults, but changes should be controlled and documented to avoid downtime.
- Use a USB extension cable to improve RF performance and reduce local interference
- Place the coordinator centrally and above floor level when possible
- Avoid placing it near Wi-Fi routers, metal cabinets, or dense cable bundles
- Consider a network-based coordinator if you need remote placement
In EU homes with reinforced concrete, first-hop link quality matters. A “better” coordinator placement often fixes more issues than any software reconfiguration.
ZHA vs Zigbee2MQTT vs deCONZ (and Mosquitto)
Home Assistant supports Zigbee through multiple integrations, each with different design goals. The most common are ZHA, Zigbee2MQTT, and deCONZ, but you should run only one Zigbee engine per coordinator.
ZHA is integrated and simpler, Zigbee2MQTT offers advanced configuration and broad device coverage, and deCONZ is tied to specific hardware ecosystems and workflows. Mosquitto is an MQTT broker and is required only when you choose Zigbee2MQTT for Zigbee transport.
| Option | Strength | Typical use case |
|---|---|---|
| ZHA | Simple setup, tight HA integration | Direct Home Assistant users and smaller networks |
| Zigbee2MQTT | High flexibility, advanced device support | Large networks, mixed vendors, tuning and debugging |
| deCONZ | Gateway-style tooling | Specific ecosystems and legacy workflows |
- ZHA path: Hardware → HAOS/host → ZHA → Home Assistant
- Zigbee2MQTT path: Hardware → HAOS/host → Zigbee2MQTT → Mosquitto → Home Assistant
- Mosquitto role: Zigbee2MQTT publishes device events; Home Assistant subscribes and updates entities
Pro tip: if you use Zigbee2MQTT, an MQTT Explorer tool on your PC can help you inspect topics and payloads during commissioning. Both ZHA and Zigbee2MQTT can support OTA updates for certain device families, but behavior varies by manufacturer and firmware.
Pairing Zigbee Devices
Pairing adds devices to the Zigbee network and assigns them to a coordinator. Devices must be put into pairing mode and added close to the coordinator or a strong router.
After pairing, devices can be moved to their final location. The mesh will automatically rebuild routes over time as routers and end devices communicate, but this process benefits from stable router power and consistent RF conditions.
- Enable pairing mode in Home Assistant (ZHA or Zigbee2MQTT UI)
- Reset the Zigbee device to a known factory state before joining
- Confirm entity creation, attributes, and reporting behavior
- Allow time for route optimization after moving devices
Pairing devices in their final position may reduce routing issues, especially in homes with thick walls. If you must pair near the coordinator, add routers first so end devices have strong nearby parents.
Related device selection guides (internal):
- Best Zigbee Hubs 2026 (Aqara / Sonoff / Tuya / SmartThings)
- Best Zigbee Sensors for Home Security
- Best Zigbee Motion Sensors 2025
- Best Zigbee Temperature & Humidity Sensors
Mesh Planning and Router Placement
Zigbee reliability depends on router density and placement. Mains-powered devices act as routers and forward traffic for battery-powered end devices.
European homes often require more routers due to reinforced concrete and brick walls. A planned mesh reduces latency and prevents random disconnections, especially for sensors located far from the coordinator.
- Place routers at regular intervals and keep them powered at all times
- Avoid placing routers inside metal enclosures or behind large appliances
- Design overlapping paths so a single router loss does not isolate devices
- Prefer routers with stable mains power and predictable placement
Monitoring routing information helps identify weak links and overloaded parents. When expanding a network, add routers first, then add battery devices into the improved coverage area.
Channel Selection and Wi-Fi Interference
Zigbee shares the 2.4 GHz band with Wi-Fi, Bluetooth, and other devices. Incorrect channel selection can cause packet loss and unstable connections, which is common in dense EU apartment buildings.
In Europe, Wi-Fi channels 1, 6, and 11 are common defaults. Selecting a Zigbee channel that minimizes overlap improves reliability, but channel changes should be rare because they require devices to rejoin and routing tables to rebuild.
- Fix Wi-Fi channels instead of using auto mode where possible
- Select Zigbee channels to reduce overlap with your chosen Wi-Fi channels
- Keep the coordinator physically separated from Wi-Fi antennas
- Re-evaluate RF planning after adding new access points or moving the coordinator
If you are troubleshooting intermittent drops, confirm USB placement, Wi-Fi channel plan, and router density before changing Zigbee channels.
Troubleshooting Common Issues
Most Zigbee issues in Home Assistant relate to RF conditions, power stability, or mesh design rather than software bugs. Logs and diagnostics provide the most actionable evidence.
Address physical and network-layer problems before reinstalling integrations or re-pairing devices. Rebuild the foundation first: stable power, stable USB, and enough routers.
- Check power supplies and USB stability; avoid low-quality hubs
- Review logs for repeated retries, disconnects, or coordinator resets
- Add routers to weak areas (mains-powered devices are the backbone)
- Verify channel overlap and reduce 2.4 GHz congestion where possible
Systematic troubleshooting leads to a Zigbee network that requires minimal ongoing maintenance, even as you add devices over time.
A reliable Zigbee network is designed, not guessed. Stable power, clean RF conditions, and proper routing solve most problems.
Home Assistant + Zigbee works best when you keep the architecture clean: a stable host (preferably HAOS), a correctly placed coordinator, one Zigbee engine, and a mesh designed for EU building materials and 2.4 GHz congestion.
If you treat watts, link quality, and device availability as signals of a layered system, troubleshooting becomes predictable: validate hardware and RF first, then confirm engine configuration, and only then adjust pairing and routing behavior.
FAQ
- Can I run Zigbee without internet access?
Yes. Home Assistant and Zigbee operate locally and do not require an active internet connection for normal operation. - Can I install Home Assistant on a PC or laptop?
Yes. You can run HAOS on generic x86-64 hardware, or use a VM/Container on a PC. For a hub, an always-on system with Ethernet is typically more stable than a laptop that sleeps. - Which Zigbee integration is best for beginners?
ZHA is usually easier to start with. Zigbee2MQTT offers more configuration options and often broader device coverage for advanced setups. - Do I need Mosquitto for Zigbee?
Only if you choose Zigbee2MQTT. If you use ZHA, Mosquitto is not required for Zigbee communication. - Why should I use a USB extension cable for the coordinator?
It helps move the radio away from USB 3.0 noise and local interference sources, improving 2.4 GHz link quality and reducing dropouts. - Do Zigbee devices slow down Wi-Fi?
They share the 2.4 GHz band, but good channel planning and physical separation typically prevent noticeable impact.
